Graphical applications on GenomeDK
Slides
Today’s slides
Table of Contents
Concepts
What is a graphical application
A graphical application provides a user interface that allows users to interact with software visually rather than through text-based commands.
Examples of graphical applications very popular in bioinformatics are Jupyterlab and Rstudio.
What is tunnelling
SSH tunneling is a method of transporting arbitrary networking data over an encrypted SSH connection
You can transport any type of data, for example when you use a command to transfer a dataset from GenomeDK to your own computer, or vice versa. Tunnelling can also be used to constantly transfer data from graphical applications, so that they can be viewed on your own computer.
Applications rendered locally with X11
There are various way of rendering applications running on GenomeDK on your local laptop. You might have encountered X11 (for example when using Rstudio Desktop installed in a conda environment), and noticed it is very laggy and slow, also graphically outdated.
X11 is based on sending all raw instructions for rendering across the network to your computer. This means that the whole graphics you see (icons, widgets, menus, buttons, …) has to travel over the network to your computer. Whenever you take an action, like opening a menu, the cluster needs to know that, so the menu can be rendered and the instructions to show it sent to your computer. This takes clearly a lot of time!
X11 does all the rendering and provides instructions to show the graphical interface. Each change in the interface has to go through the network to be shown locally.
Applications rendered locally with a web interface
A faster and lighter way of rendering applications is through web-based interfaces. A web server is deployed on the cluster, and it transfer data over the network. Rendering instructions are all executed directly by the browser on the local computer, and do not need to travel over the network.
What travels over the network are simple scripts, which th browser will interpret to visualize and update the graphical interface. Examples of web-based applications are Rstudio Server and Jupyterlab, but also all the interactive browsers that you can find online to explore OMICS data!
Web based applications transmit only the necessary information to the local computer, minimizing bandwidth use compared to raw graphical instructions. Those applications are optimized for remote access, ensuring a more fluid experience.
Containers for web applications
Some web-based applications are cumbersome to install (Rstudio server being the worst, probably, amongst softwares used by academics and researchers), cannot be deployed through a conda environment (Rstudio server again!), or require some administrator privileges to be installed (Once more, Rstudio server!). Here is where we can use containers: those include all the necessary operating system libraries and the software to make specific applications work. You can simply launch a container from the cluster, and it will be able to execute its installed web-based application without much effort.
A container is an isolated environment that packages a web-based application and all its dependencies (e.g., libraries, runtime, and configuration) so it can run consistently anywhere. On an HPC system without administrator privileges, containers are especially useful because all steps requiring elevated privileges can be avoided.
Containers can be created with various softwares, the most famous being Docker and Singularity/Apptainer. The latter can import containers from Docker almost seamlessly, and you will see how it is used to launch a session of RStudio server.
Tutorial
- account on GenomeDK
- a project on GenomeDK to run a small job
- conda package manager
Launch Rstudio
The most practical way to launch Rstudio is through a web application with Rstudio server, deployed from a container, instead of Rstudio desktop deployed with X11 forwarding from a conda environment, which can cause a number of incompatibilities depending on your local computer. Follow these step-by-step instructions with explanations:
Log into GenomeDK as usual. In your own project, create a folder dedicated to Rstudio, so that it is there and usable by you or others in the project. For example do
mkdir -p rstudio; cd rstudioCreate a conda environment with some R packages. I have made one for you with
R v4.4.2,renv,ggplotandtidyverse.wget https://raw.githubusercontent.com/AU-ABC/AU-ABC.github.io/refs/heads/main/documentation/2024-11-28-ABC9/ABC9rstudio.yml conda env create -f ABC9rstudio.ymlIf you already have an environment with R and some R packages, do not create the one above, but activate yours.
Check your user id. This is specific to you. Note it down, because you will need it.
echo $UIDOnly once you need to download the container which provides Rstudio. Here we use version 4.2.2 because it has been tested for this tutorial:
singularity pull docker://rocker/rstudio:4.2.2At this point you should have a file called something like
rstudio_4.2.2.sif.Do the steps below only once in the same folder where you have the
siffile. This will created folders and configurations which allow Rstudio server to work.mkdir -p run var-lib-rstudio-server printf 'provider=sqlite\ndirectory=/var/lib/rstudio-server\n' > database.confEvery time you want to run Rstudio, open tmux to have a permanent desktop in background and request an interactive job. Your session and interactive job will not close even if you accidentally close the command line interface!. For example below I request a job with 2 cores, 32GB of RAM for 4 hours for the project
myProject. Note that you also need a conda environment to be active with an R installation and the needed packages.tmux new -t rstudio rm -rf ~/.local/share/rstudio/ #remove old cache srun --mem=32g --cores=2 --time=4:00:0 --account=myProject --pty bash conda activate ABC9rstudioCheck the name of the node and note it down by running
hostnameand finally open Rstudio:
singularity exec --bind run:/run,var-lib-rstudio-server:/var/lib/rstudio-server,database.conf:/etc/rstudio/database.conf rstudio_4.2.2.sif rserver --www-address=`hostname` --www-port $UID --server-user $USERNow you need to create a tunnel between your computer and the cluster. Get ready with your user id and node name. Open a second, new terminal window, and write
ssh -L<USERID>:<HOSTNAME>:<USERID> <USERNAME>@login.genome.au.dkYou should see Rstudio if you write the following address in your browser
localhost:<USERID>writing your user id instead of <USERID>.
Now you are ready to use Rstudio and all the packages from your conda environment. Note that the environment contains the package renv, so you can also start creating virtual R environments from Rstudio, as we did in the second ABC tutorial.
What to do if I close the terminals or I lost internet connection?
Simple, open a terminal and recreate a tunnel with
ssh -L<USERID>:<HOSTNAME>:<USERID> <USERNAME>login.genome.au.dkThe tmux software has kept your terminal running without interruption, so now Rstudio should be visible in your browser.
Web application with jupyterlab
Log into GenomeDK as usual.
Create a conda environment with some R packages, python, jupyterlab. I have made one for you with
R>v4.4.0,python v3.10, the AI plugin for jupyterlab and some R packages.wget https://raw.githubusercontent.com/AU-ABC/AU-ABC.github.io/refs/heads/main/documentation/2024-11-28-ABC9/ABC9jupyter.yml conda env create -f ABC9jupyter.ymlCheck your user id. This is specific to you. Note it down, because you will need it.
echo $UIDEvery time you want to run jupyterlab, open tmux to have a permanent desktop in background and request an interactive job. Your session and interactive job will not close even if you accidentally close the command line interface!. For example below I request a job with 2 cores, 32GB of RAM for 4 hours for the project
myProject. Note that we activate the conda environment which containstmux new -t rstudio srun --mem=32g --cores=2 --time=4:00:0 --account=myProject --pty bash conda activate ABC9jupyterCheck the name of the node and note it down by running
hostnameDownload the Mistral LLM open model trained on 7Billion parameters
mkdir -p /home/`whoami`/.cache/gpt4all/
wget -nc -O /home/`whoami`/.cache/gpt4all/mistral-7b-openorca.Q4_0.gguf https://huggingface.co/TheBloke/Mistral-7B-OpenOrca-GGUF/resolve/main/mistral-7b-openorca.Q4_0.gguf
Run jupyterlab
jupyter lab --ip=`hostname` --port=$UID --no-browser --NotebookApp.token='' --NotebookApp.password=''Now you need to create a tunnel between your computer and the cluster. Get ready with your user id and node name. Open a second, new terminal window, and write
ssh -L<USERID>:<HOSTNAME>:<USERID> <USERNAME>@login.genome.au.dkwriting your user id, hostname and username instead of
<USERID>,<HOSTNAME>and<USERNAME>.You should see Rstudio if you write the following address in your browser
127.0.0.1:<USERID>/labwriting your user id instead of <USERID>. Jupyterlab will open!
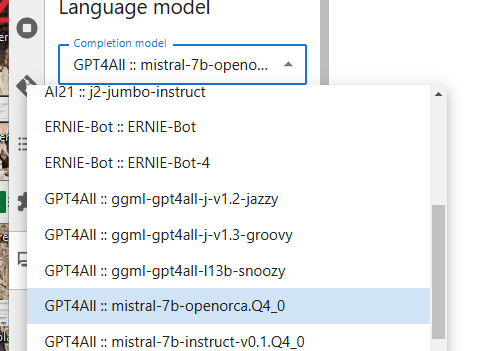
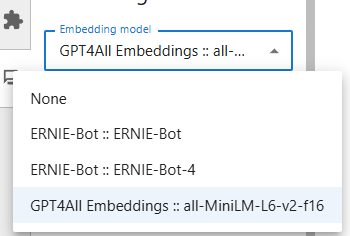
- Now click on the AI plugin on the left-side toolbar with symbol
 . Open the settings as suggested, and choose the Mistral model and the ChatGPT embedding which allows to use the language model (see choices below), then Save the settings and go back with the arrow on top of the plugin window.
Now you can ask any question in the plugin. Simply write
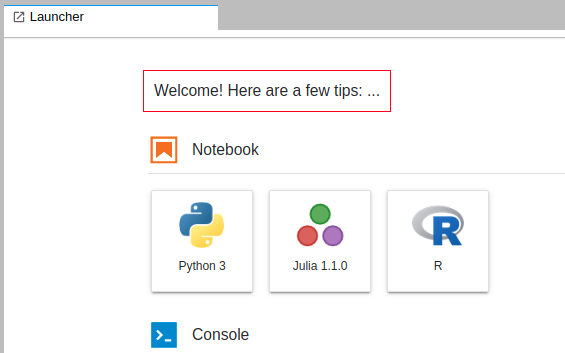
/askfollowed by what you want to know. It requires some resources to use an LLM, so it might be slow withthe resources used in this tutorial.Use the launcher to choose if you want to start a notebook with python or R, including the packages installed in the conda environment. The launcher looks similar to this:
Conclusion
You have learned how to launch a graphical application from a container and from a conda environment, with tunnelling between your local computer and the GenomeDK cluster. The same principles work for other graphical tools with a web interface which can be installed and launched in a conda environment, or are installed in a container. Every software requires its own command to start, so you have to read its documentation :)